pythonweb框架flask学习(更新) | python 技术论坛-金年会app官方网
[toc]
写在前面
相信使用python开发的朋友应该对flask这个轻量级web框架应该很熟悉了,我们这里就不做详细介绍了,本文主要介绍flask的安装,使用flask编写一个简单的web服务。
安装
我们知道python主流的包管理工具是pip,首先你必须安装pip,这里我们使用的是python3,pip的版本也是pip3,这里不做介绍了,怎么,或者直接使用以下命令:
pip install flask快速使用
简单实例
直接看实例:
from flask import flask  #导入模块
app = flask(__name__)  #启动配置
@app.route("/")  #装饰器,配置router
def hello():  #处理方法
    return "hello, world!"
接着使用命令:
$ export flask_app=ppt1_2.py
$ flask run
或者我们这样使用:
from flask import flask
app = flask(__name__)
@app.route("/")
def hello():
    return "hello, world!"
if __name__ == "__main__":
    app.run(host="0.0.0.0", port=3000)
直接使用命令:
$ python3 ppt1_2.py 配置
从配置中获取
from flask import flask
app = flask(__name__)
app.config["debug"] = true  #配置
@app.route("/")
def hello():
    return "hello, world!"
if __name__ == "__main__":
    app.run(host="0.0.0.0", port=3000)
启动服务我们可以看到日志中:
 * serving flask app 'ppt1_3'
 * debug mode: on
从其他文件中获取
from flask import flask
app = flask(__name__)
app.config.from_object("config.base_setting")
@app.route("/")
def hello():
    return "hello, world!"
if __name__ == "__main__":
    app.run(host="0.0.0.0", port=3000)
从环境变量中获取
from flask import flask
app = flask(__name__)
app.config.from_envvar("opt_config")
@app.route("/")
def hello():
    return "hello, world!"
if __name__ == "__main__":
    app.run(host="0.0.0.0", port=3000)
从配置文件中获取
from flask import flask
app = flask(__name__)
app.config.from_file("config/base_setting.py")
@app.route("/")
def hello():
    return "hello, world!"
if __name__ == "__main__":
    app.run(host="0.0.0.0", port=3000)
路由注册
flask路由注册主要有以下两种方式:
- app.router()和app.add_url_rule()
- 蓝图优化
app.route
实例:
from flask import flask
app = flask(__name__)
@app.route("/")  # 注册路由,绑定处理方法
def hello():
    return "hello, world!"
@app.route("/my_info")    # 注册路由,绑定处理方法
def my_info():
    return {"name": "iceymoss", "age": 18}
if __name__ == "__main__":
    app.run(host="0.0.0.0", port=3000)
在url中传入参数:
from flask import flask
app = flask(__name__)
@app.route("/")
def hello():
return "hello, world!"
@app.route("/my_info/" )
def my_info(user_name):
return {"name": user_name, "age": 18}
if __name__ == "__main__":
app.run(host="0.0.0.0", port=3000)
访问:
返回:{“age”:18,”name”:”idfjdif”}
app.add_url_rule
实例:
from flask import flask
app = flask(__name__)
def hello():
return "hello, world!"
def my_info(user_name):
return {"name": user_name, "age": 18}
app.add_url_rule(rule="/", view_func=hello)
app.add_url_rule(rule="/my_info/" , view_func=my_info)
if __name__ == "__main__":
app.run(host="0.0.0.0", port=3000)蓝图优化
实例:
from flask import flask, blueprint
app = flask(__name__)
index_page = blueprint("index_page", __name__)
@index_page.route("/")
def hello():
    return "hello, flask"
app.register_blueprint(index_page, url_perfix="/my_info")
if __name__ == "__main__":
    app.run(host="0.0.0.0", port=3000)
使用蓝图我们可以进行分层,比如说我们的service负责编写处理方法,router目录负责配置路由注册绑定方法。
service:
from flask import flask, blueprint
index_page = blueprint("index_page", __name__)
@index_page.route("/hello")
def hello():
    return "hello, flask"
@index_page.route("/user_info")
def get_user():
    return {"name":"iceymoss", "age": 18}
router:
from flask import flask
from service import index_page
app = flask(__name__)
app.register_blueprint(index_page, url_prefix="/api")
if __name__ == "__main__":
    app.run(host="0.0.0.0", port=3000)
这样就完成了分层,结构更有层次。
方法
get方法
实例:
@index_page.route("/add")
def get_good():
    var_a = request.args.get("a", 0) #request.args.get()获取get方法的参数
    var_b = request.args.get("b", 0)
    return "计算结果:{0}".format(int(var_b)int(var_a))
访问:
返回:计算结果:110
post方法
实例:
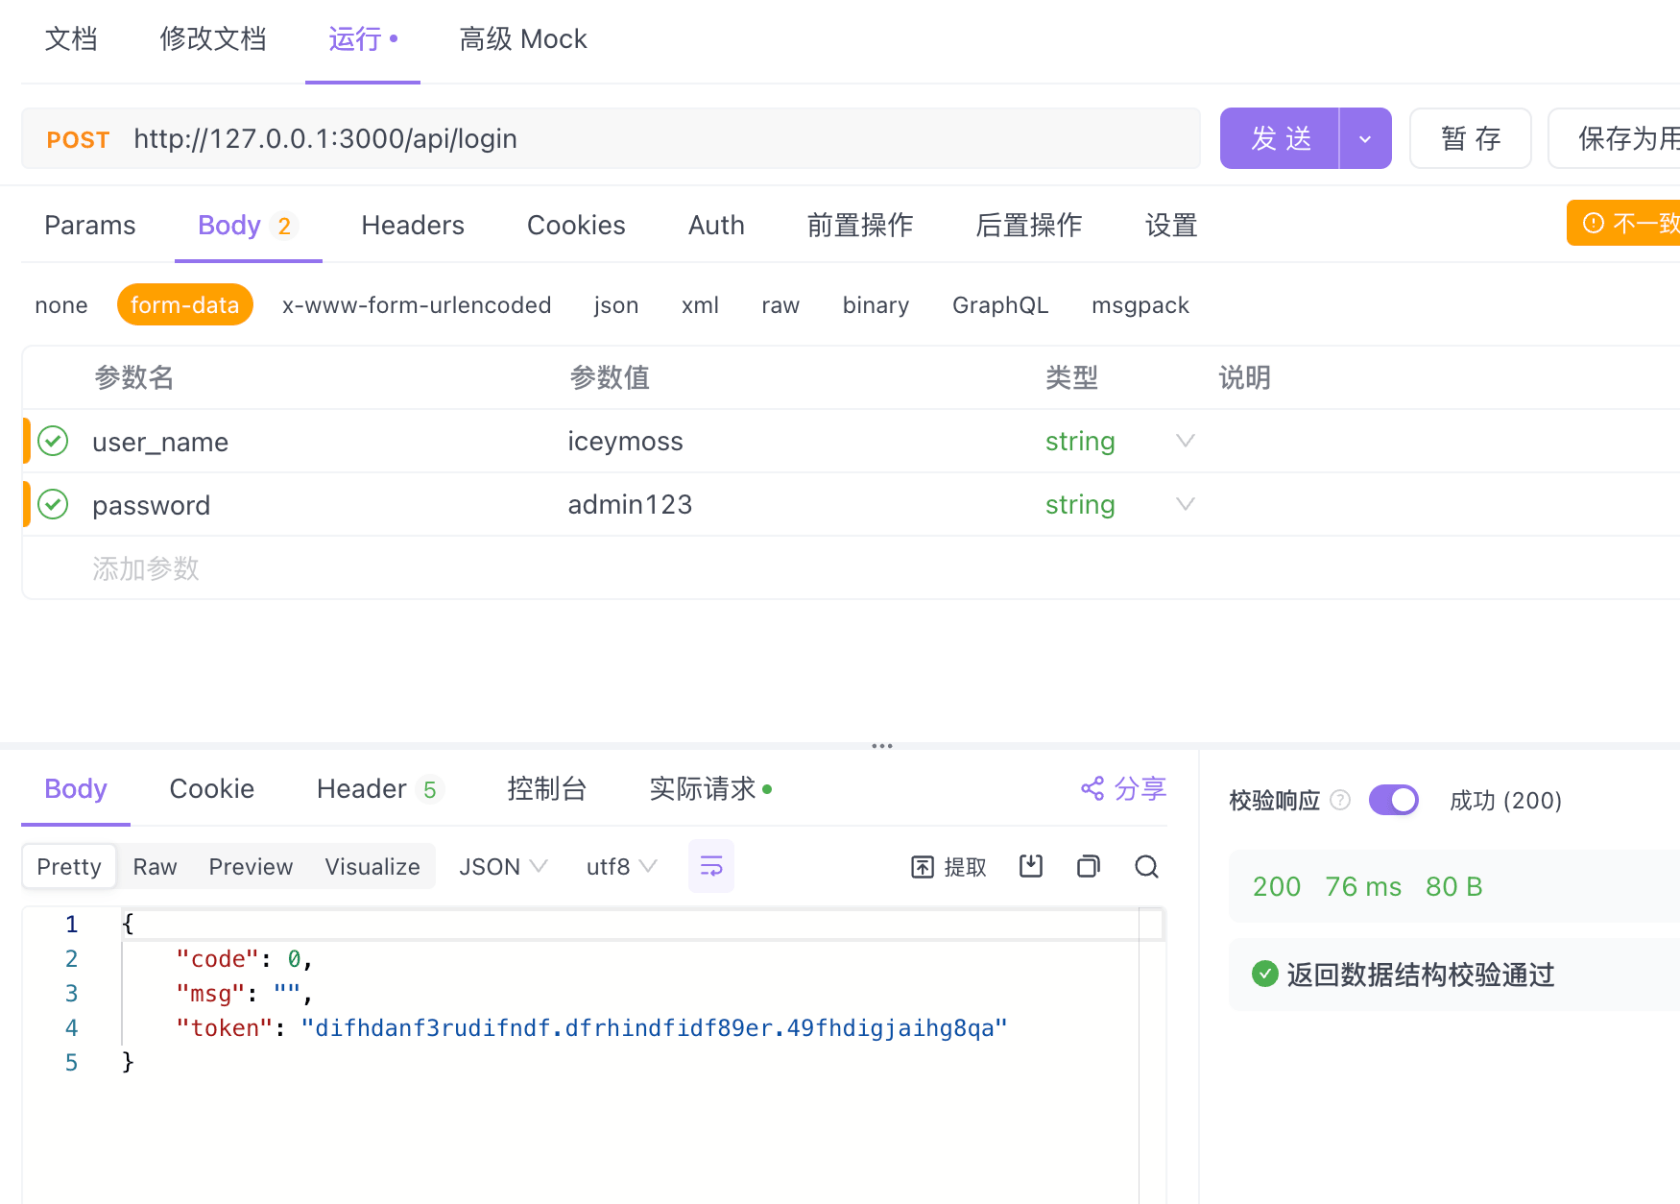
@index_page.route("/login", methods=["post"])
def loging():
    user_name = request.form["user_name"]
    password = request.form["password"]
    if user_name == "iceymoss" and password == "admin123":
        return {"code": 0, "msg": "", "token": "difhdanf3rudifndf.dfrhindfidf89er.49fhdigjaihg8qa"}
    return "用户名称或密码不正确"
浏览器不能直接测试post方法,这里使用apifox进行测试:
文件上传
实例:
@index_page.route("upload", methods = ["post"])
def upload():
    f = request.files["file"] if "file" in request.files else none
    return "request: %s, params: %s, file:%s"%(request.method, request.files, f)
响应
简单的阅读完请求的内容,现在我们看一下在处理方法内部如果做响应,首先我们需要导入flask的make_response模块,然后使用make_response提供的方法让我们可以根据业务需求完成对应的响应。
普通响应
实例:
from flask import flask, blueprint, request, make_response
index_page = blueprint("index_page", __name__)
@index_page.route("/text_same")
def text_same():
    response = make_response("text/html", 200) # 设置响应
    return response
json响应
返回json数据类型
实例:
from flask import flask, blueprint, request, make_response
index_page = blueprint("index_page", __name__)
@index_page.route("/json")
def json():
    import json
    user_info = {"name": "iceymoss", "age": 18, "live": "shanghai"} # 返回数据
    response = make_response(json.dumps(user_info)) # 转json
    response.headers["content-type"] = "application/json"  # 配置响应头信息
    return response
一种更简洁的方式完成以上功能:
实例:
from flask import flask, blueprint, request, make_response, jsonify
@index_page.route("/json_test")
def json_test():
    user_info = {"name": "iceymoss", "age": "18", "live": "shanghai"}
    response = make_response(jsonify(user_info))
    return response
渲染模版
首先我们要知道目录层级:
├── router.py
├── service.py
└── templates
    └── index.html
index.html:
<html lang="en">
    <head>
        <meta charset="utf-8">
        <title>indextitle>
        <meta name="description", content="金年会app官方网首页">
        <meta name="keywords", content="责任、关爱">
    head>
    <body>
        <div class="header">

            <div class="loge">
                <h1>欢迎来到金年会app官方网首页!h1>
            div>
        div>
    body>
html>
router.py:
from flask import flask
from service import index_page
app = flask(__name__)
app.register_blueprint(index_page, url_prefix="/api")
if __name__ == "__main__":
    app.run(host="0.0.0.0", port=3000)
service.py:
from flask import flask, blueprint, request, make_response, jsonify, render_template
index_page = blueprint("index_page", __name__)
@index_page.route("/index")
def index():
return render_template("index.html") 注意:默认会到和程序入口的同级目录找templates目录,然后匹配对应的index.html。
jinja2
传递变量
我们将python程序中的变量写入到thml中,这里目录结构和上一个实例一致。
实例:
from flask import flask, blueprint, render_template
index_page = blueprint("index_page", __name__)
@index_page.route("/index")
def index():
      # 传值
    name = "iceymoss"
    return render_template("index.html", name=name)
访问:
返回:
欢迎来到金年会app官方网首页!
iceymoss
我们也可以直接使用字典,实例:
from flask import flask, blueprint, render_template
index_page = blueprint("index_page", __name__)
@index_page.route("/index")
def index():
    user_info = {"name": "iceymoss", "age": "18", "live": "shanghai"}
    return render_template("index.html", name=user_info)
返回:
欢迎来到金年会app官方网首页!
{'name': 'iceymoss', 'age': '18', 'live': 'shanghai'}
jinja2语法
if和for
我们在html中经常会使用到if和for,现在我们看一看jinja2是如何实现的
实例:
from flask import flask, blueprint, render_template
index_page = blueprint("index_page", __name__)
@index_page.route("/index")
def index():
    user_info = {"name": "蔡徐坤", "age": "28", "live": "shanghai", "skill": ["唱", "跳", "rap", "篮球"], "features":["ban小黑子", "你干嘛!哎呦", "🐔霓太美"]}
    return render_template("index.html", user=user_info)
下面是html
<html lang="en">
    <head>
        <meta charset="utf-8">
        <title>indextitle>
        <meta name="description", content="首先">
        <meta name="keywords", content="责任、关爱">
    head>
    <body>
        <div class="header">

            <div class="loge">
                <h1>欢迎来到金年会app官方网首页!
                    <p>
                        {% if user %}
                        姓名:{{user.name}} 年龄:{{user.age}} 现居:{{user.live}}
                        {% endif %}}
                    p>
                    <p>
                        {% for skill in user.skill %}
                        {{skill}}
                        {% endfor %}
                    p>
                     <p>
                        {% for feature in user.features %}
                        {{feature}}
                        {% endfor %}
                    p>
                h1>
            div>
        div>
    body>
html>
这样我们访问:
返回:
欢迎来到金年会app官方网首页!
姓名:蔡徐坤 年龄:28 现居:shanghai }
唱 跳 rap 篮球
ban小黑子 你干嘛呢哎呦 🐔霓太美
模版继承
判断jinja 中最强大的部分就是模板继承。模板继承允许你构建一个包含你站点共同元素的基 本模板“骨架〞,并定义子模板可以覆盖的 块。听起来复杂,实际上很简单,实例结构:
├── router.py
├── service.py
└── templates
    ├── common
    │   └── layout.html
    ├── extend_template.html
router.py:
from flask import flask
from service import index_page
app = flask(__name__)
app.register_blueprint(index_page, url_prefix="/api")
if __name__ == "__main__":
    app.run(host="0.0.0.0", port=3000)
service.py:
from flask import flask, blueprint, render_template
index_page = blueprint("index_page", __name__)
@index_page.route("/index")
def index():
    user_info = {"name": "蔡徐坤", "age": "28", "live": "shanghai", "skill": ["唱", "跳", "rap", "篮球"], "features":["ban小黑子", "你干嘛呢哎呦", "🐔霓太美"]}
    return render_template("index.html", user=user_info)
@index_page.route("/extend_template")
def extend():
    return render_template("extend_template.html")
extend_template.html:
{% extends "common/layout.html" %}
{% block content %}
练习时长两年半
{% endblock %}
layout.html:
<html lang="en">
<head>
    <meta charset="utf-8">
    <title>统一模版title>
head>
<body>
  {% block content %} {% endblock %}
body>
html>
访问:
返回:练习时长两年半
本作品采用《cc 协议》,转载必须注明作者和本文链接

前段时间也在学习flask,用过php的框架感觉flask有点原始啊
我在试着用laravel的方式封装 flask
感觉 fastapi 要好点,就是生态不行